DIY Easy Felt Heart Garland

2015/01/img_0321.jpg

Hello, friends!  I’m popping in with my first post of the year (at least it’s still January, right?!) with a little tutorial for you – an incredibly easy felt heart garland!  A little something to spruce up your home with some valentine’s day flair.  Ready?  Ok, here you go.  Here are your materials:

  • heart template
  • felt (I used red and pink craft felt sheets that I believe I got at Joann)
  • scissors
  • marker (I used a disappearing ink marking pen)
  • fiberfill stuffing
  • twine some sort of thin string (note: I had originally wanted to use twine but it was too thick to string through the hearts)
  • large embroidery or tapestry needle

This was maybe the easiest project ever.  And economical.  I already had all the materials at home so that makes it free, yeah?  I realize that this project may be super self-explanatory since it’s soooo simple, but I’ll go ahead and share how I made mine anyway!  Cool?  Cool.

2015/01/img_0320.jpg

First, you will need to cut out a heart shape on card stock for your template.  My heart measures about 2.5″ x 3″.  Next, get out your felt sheets (or scraps) and trace your heart with a marker or pen.  Trace as many as you wish. We will be using two heart pieces to make one stuffed heart.

2015/01/img_0332.jpg

Cut out your hearts.

2015/01/img_0333.jpg

Next, take two hearts and align one on top of another.  Pin if you wish and sew along the edge of the hearts using a 1/8″ seam allowance, making sure to leave about a 3/4″ opening somewhere near the bottom of the hearts.

2015/01/img_0334.jpg2015/01/img_0335.jpg

Stuff your heart with the fiberfill stuffing, and then sew the opening closed, making sure to backstitch at the beginning and end.  And now you have a cute little stuffed heart!  Wasn’t that easy?  Go make some more!

2015/01/img_0336.jpg2015/01/img_0337.jpg

Finally, take a large embroidery or tapestry needle and string through all the hearts you’ve made for your garland.  I strung through the upper middle part of each heart.  And felt is so dense that the needle pushes through easily, even right through my machine default 2.5mm stitch length that I used.

2015/01/img_0338.jpg2015/01/img_0339.jpg

And that’s it, folks!  Now go hang up your heart garland and smile each time you walk by it!

2015/01/img_0340.jpg2015/01/img_0341.jpg

And, juuuust in case you were wondering, I also made those adorable XOXO and heart pillows you see up there in the first photo with my little man.  They are also available in my Etsy shop: MADE to play.  Yes, the shop is finally up and running!  My friend and I had to get all the logistics and legal stuff all squared away first, but we are super uber excited about it (and I’m totally cheesing right now, ha)! Come by and take a peek when you have a chance! 🙂

heart, jen

yup, that’s a new signature you see up there — new year, new signature! happy (belated) 2015!

DIY Advent Calendar

DIY Advent Calendar {chirpy threads}Hello, friends!  I literally just finished up my son’s advent calendar the night before December 1st. I’m such a last minute mommy.  But, I do love how it turned out! We saw some really cool Lego and Playmobil calendars and actually almost got one, but I decided to make one instead with little gifts that I knew Ethan would love for sure.

I started out by purchasing some little wooden display cubbies at Daiso.  For those of you who don’t know this store, it is awesome – it’s the dollar store of Japan and here in the US, everything in the store is $1.50.  See, awesome, right?! Anyway, I found these cubbies there – they came in one row of three so I bought 8 of them so I could have a total of 24 cubes.  I arranged them together and used wood glue and clamps to put them together to make one large box of 24 cubbies.DIY Advent Calendar {chirpy threads}So, guess what I stuffed into these mini paper sacks that I got from Michaels?  Shopkins!  Omigosh, guys, I’m not really sure why Ethan is so obsessed with these little things but he loves them!  So I put one in each bag, punched two holes in the center and tied it with baker’s twine.  Next, I used my Silhouette to print and cut little circles with numbers and used double-sided tape to stick them to the mini sacks.DIY Advent Calendar {chirpy threads}DIY Advent Calendar {chirpy threads}I also used my Silhouette to make the gable box for the 25th day which just contains a special piece of chocolate.  And lastly, I made a December label and adhered it to a clothespin that clips onto a little wood box I found lying around the house.DIY Advent Calendar {chirpy threads}DIY Advent Calendar {chirpy threads}DIY Advent Calendar {chirpy threads}So there you have it… a Shopkins Advent Calendar!  Ha!  Happy December!

xoxo, Jen

Pikachu Costume!

Pikachu Costume {chirpy threads}Hey there! This year, Ethan wanted to be Pikachu for Halloween! Although he is only four, and doesn’t know too much about Pokemon, he loves this cute little yellow character. It was between a moth and Pikachu, so I’m happy with his decision! This will be my second Halloween sewing him a costume. Last year, he was a spider – which was also really fun to make.

Pikachu Costume {chirpy threads}

I made this Pikachu costume virtually the same way as the spider costume. It is a pullover hooded vest that is cinched on the bottom with elastic. The pullover from last year was self-drafted and I basically just used that as a guide and made it a little wider and longer for this year. All of the yellow fabric is anti-pill fleece (from Joann) and the brown and black details are felt material. The top of the lightning bolt tail, which is stuffed with poly-fil, is sewn into the back to keep it from flopping down. It still flops, but from side to side. The ears are also filled with poly-fil. There he is in the above photos, being silly and trying to do a handstand!

Pikachu Costume {chirpy threads}

The hood is lined with a yellow cotton interlock that I also found at Joann. For the pants, I used Dana’s basic pant pattern and just made it a tad bit wider and longer. Super easy sew. The shirt, which is also made from the yellow cotton interlock, was made using Rae’s flashback skinny tee pattern. This was my first time sewing a shirt – and although there is a lot I need to improve on, it turned out not as bad as I thought it would! I used a regular sewing machine and I didn’t even need to change my needle! Crazy, huh. I think it was because cotton interlock is a thicker type of knit. Anyway, it was a breeze to sew! I also didn’t hem the sleeves as it turned out to be the perfect arm length for Ethan. I guess I could have added cuffs but I was too excited that his costume was finally completed and actually wearable!

Pikachu Costume {chirpy threads}

I also made a Pokeball trick-or-treat bag to go with the costume. Pretty basic stuff – just a huge 14×32 rectangle folded in half and sewn along the edges with the corners boxed. I used duck cloth for this so it is very sturdy and holds well. The pokeball is appliquéd on in pieces of red, white, and black felt.

Pikachu Costume / Pokeball Bag {chirpy threads}

And now, I have a cute little boy running around the house shouting “pika, pika” all day! He sure loves getting into character!

Pikachu Costume {chirpy threads}

Pikachu Costume {chirpy threads}

And I leave you with this last photo of Ethan cooking up some tasty spider, cockroach, and glow-in-the-dark fingers stew! Delicious!

Pikachu Costume {chirpy threads}

Happy Halloween, guys! Be safe out there!

xoxo, Jen

Dragon Birthday Party

dragon birthday party {chirpy threads

Oh man… sooooo… even though this birthday party took place FIVE months ago, I am still going to blog about the details!  Cool?  Cool.  Better late than never, right?  Actually, I really needed to post this blog entry before I could move on… I couldn’t bring myself to blog about any other project until I blogged about this ancient party.  Ha!   And, of course, it’s to hopefully inspire anyone who’s kids are into dragons and wants to throw them a dragon party!  But seriously, I have sooooo many completed projects lined up and ready to be shared.  Yikes!

I also wanted to share what I’ve been working on these past few months… I’ve been working hard!  Really, I have!  I’ve made a few play things for Ethan, sewn up gifts for friends, and have been trying to build an Etsy shop.  YUP!  I’m going to start up an Etsy shop with a friend very soon!  It’s been so exciting working out all the fine details of the little shop.  More on this to come!  Oh, and I completed Ethan’s Halloween costume last week — yes, I really wanted to share the costume I made so I need to finally get the birthday stuff out of the way.  So, without further ado… let’s get back to the dragon party!!

dragon birthday party {chirpy threads

My Ethan turned FOUR way back in May and the theme he close was dragons – like, the scary kind.  You know, fire-breathing dragons!  Um… ok, we can have a scary dragon party but still make it cute, right?  Four-year-olds are still babies, right?!  *sigh*.  Hopefully, this isn’t the last year I can plan a party with a little cuteness.  I still can’t get over how fast my son is growing up.

dragon birthday party {chirpy threads

I can usually find good party inspiration on the internet but discovered that dragon birthday parties were pretty rare.  So I got to thinking – and thought scales and dragons and lots of green would work.  I made a dragon scale backdrop and decided that the the cake table would be the the main focus.  For the backdrop, I reused the foam display board from last year’s superhero birthday party and cut out a TON of fabric “scales” in three shades of green, and stuck them onto the board with double-sided tape, slightly overlapping each one.  And boy oh boy, this was truly a labor of love!  I divided this task into several days/nights, working on it whenever I was in the right mood.  But it turned out so cute, so it was worth every sleepless night!  The burlap happy birthday banner was made a couple years ago and it sort of fit the rustic-like theme so I reused it here.  The dragon cake is from Torrance Bakery (a local bakery here in SoCal) – they did such a fantastic job!  I also tried to find as much green sweets as I could – hence, the green gummy bears, jelly beans, and yogurt pretzels! Ha!

dragon birthday party {chirpy threads}dragon birthday party {chirpy threads}

Ahh, I’d have to say my favorite part of the party was the paper mache dragon eggs! These, my friends, were another true labor of love as well!  My scissors, tissue paper, and mod podge were my besties for several days.  I got my inspiration and tutorial for these eggs here.  I made a few eggs each for all the kids and put treats and little toy dragons inside them for the big “dragon egg hunt”.  I also made a wood “dragon egg hunt” sign using some cheap plywood and stick I got at a craft store.  Man, this activity was so much fun for the kids!

dragon birthday party {chirpy threads}dragon birthday party {chirpy threads}

I kept the other decorations very simple.  I created a few dragon prints on good old PowerPoint using the images I purchased over at poppydreamz on Etsy.  I also made the party invitations using these cute dragon images.  I blogged about that as well as Ethan’s dragon cape here.  The multi-shades-of-green pennant garlands were made using card stock and twine – super easy and adds a bit of festive flair!  I bought wooden utensils from Amazon and used washi tape to dress up the ends for a pop of color.

I forgot to mention that I wanted to add a bit of woodsiness to the party as well – I’m sure you can sort of tell from the photos?  Maybe?  I used these wood chargers that I had as well as these wood bark coasters, all from World Market – love that store!

dragon birthday party {chirpy threads}dragon birthday party {chirpy threads}dragon birthday party {chirpy threads}

Mmm.  Don’t those cookies look yummy?  These ahh-mazing dragon cookies were made by my friends over at Two Sweet and Crafty.  These women are so talented!  If only I could bake… maybe someday I’ll try my hand at it.  But for now, I think I will just stick to sewing!

dragon birthday party {chirpy threads}

And finally, the photo booth area!  I thought a stone/rocky background would be appropriate for dragons.  The backdrop is from here.  That fire-y looking cup that Ethan is blowing into was another craft I had set out on the kids’ table.  It’s a green paper cup with the bottom cut out and strips of red and orange tissue paper glued around the perimeter of the top.  It’s supposed to be the “fire” for all the “fire-breathing” dragons!  🙂

dragon birthday party {chirpy threads}

And that’s all I have for now, folks!  Now, I can finally move on and share with you Ethan’s costume!  I can’t believe Halloween is THIS week!  Why is it the end of October already?!

xoxo, Jen

Birthday Dragon Cape and Party Invitation

birthday dragon cape {chirpy threads}

We celebrated Ethan’s 4th birthday last weekend with a dragon themed party and it was so much fun!  He had been really into dragons for awhile and chose the theme a few months ago… and, much to my surprise, stuck with it without changing his mind.  And so… I had to make him a dragon cape!  Yup.  And guess what?  He loved it!  That always puts a smile on my face.

birthday dragon cape {chirpy threads}

Once again, I used the superhero cape pattern by Georgia Leigh, in a size 4.  I cut the cape in half to add some little felt triangle spikes and wings that I loosely drafted by looking at an old dragon costume that Ethan wore two halloweens ago.  I also attached a tail to the bottom of the cape.  Both the green tie-dyed flannel fabric and forest green felt came from Joann.

birthday dragon cape {chirpy threads}

I had to hand stitch the wings to the cape at the top to keep it from flopping down.  I also sewed some vertical lines on the wings to make it appear more dragon-like.  Not sure if it worked though – people kept asking if he was a dinosaur!  Um, dinosaurs do not have wings!  Come on now, people!  Haha!

birthday dragon cape {chirpy threads}

birthday dragon cape {chirpy threads}

birthday dragon cape {chirpy threads}

DSC_0142 EditedCT

I love this pattern so much.  It’s so versatile – and, as you can see, it’s not just for superheroes!  I’ve used it many times (herehere, and here) and with different types of fabric!

Anyway, back to the party… this is the invitation that I created for Ethan’s birthday party!  I bought a set of dragon images from this Etsy shop.  The dragon, cake, presents, and stars are from this set which was customized for me.  I put together the invitation on PowerPoint and made the tower and flag banner using the shapes on the program.  The fiery font I used is called flames and can be found and downloaded here for free.

dragon birthday invitation {chirpy threads}

Details of the party to follow very soon!

xoxo, Jen

Far Far Away Divided Basket

divided basket {chirpy threads}

I just love this little basket!  This was my first attempt at the divided basket pattern by noodlehead.  I had bought it when it first came out – a long, long, loooooong time ago… but filed it away in my “digital patterns” folder on my laptop and just forgot about it, like I do with most patterns that I purchase on a whim because I fall in love with them at first sight.  (please don’t judge!)  Anyway, a friend had a baby shower last week and this was one of the first gifts that came to mind because so many other talented sewing bloggers have made these as baby gifts and I loved how they all turned out!

divided basket {chirpy threads}

I used some far far away III fabric by Heather Ross.  This one is an old print but my local fabric store still carries it and I loved it for this baby basket.  I’m sure Etsy may still have it too.  I chose to use a solid tan for the lining as well as the pocket binding.  I wanted to use something with a small print but couldn’t find fabric that matched.  I think it turned out nice with the solid contrast though.

divided basket {chirpy threads}

divided basket {chirpy threads}

I love, love, love it as a diaper caddy.  But I think I’ll make another one for us to hold some of Ethan’s things in the car.  I’m sure he will find a way to fill it up quickly too!  We currently have a few toy cars, crayons, coloring books and other “stuff” just hanging out on the seat next to Ethan’s car seat.  Nope, not too pretty.

divided basket {chirpy threads}

divided basket {chirpy threads}

Anyway, this pattern is super awesome.  The way it all came together with the divider was uber ah-mazing.  Seriously.  I can’t believe I actually made it.  I can see this as a pattern that will definitely be used over and over again.  So give it a try too!

xoxo, Jen

PS – Can I get a woohoo!  It’s my first post in 2014!  Ok, sorry for being a little melodramatic but I couldn’t leave without saying that.  Haha!  I’ve been sewing and making things, but also spending some quality time with my little Ethan since he won’t be so little anymore soon.  Geez, where does the time go?  He will be FOUR in a couple weeks!  Ok, so stay tuned for party stuff too.  Be back soon!

Meadow Friends Baby Snuggler

Meadow Friends Baby Snuggler {chirpy threads}

My sister is having a baby girl in a few months and I wanted to make her something as she enters her most exciting phase of pregnancy – the nesting phase!  I’m so excited that I get to sew for a girl now!  I love making things for Ethan… but, this is sort of refreshing and different, ya know?  And all the girly fabric out there… oh my, it is overwhelming but so much fun to look at!  Anyway, the first sewing book I ever purchased was Simple Sewing for Baby by Lotta Jansdotter.  I finally took it off the shelf, dusted it off, and made the baby snuggler that I’ve wanted to make for ages!  Actually, I’ve made a couple things from this book before but they were really simple – the giraffe and the simple pants – two of my first projects sewn two years ago. This baby snuggler wasn’t too bad to sew up but it did take some time for me to put together.  I worked super slow on it, making sure the darts and notches matched up.  And I’m glad I did – because I love it!  Hopefully, this baby will like to be swaddled.

Meadow Friends Baby Snuggler {chirpy threads}

The outside fabric is from Birch Organic Fabric’s Storyboek II collection called Meadow Friends Shroom.  I just love this fabric!  It’s girly but not so much.  But it definitely has that baby vibe.  The lining is a super soft flannel in ivory by Robert Kaufman.  I bought the fabric from my local fabric shop, Momen+, but you can usually find it online here.

Meadow Friends Baby Snuggler {chirpy threads}

Oh, and the pattern is also free here if you’d like to make a snuggler and don’t have the book yet! It’s the perfect newborn gift.

I didn’t have a baby to model so I used one of Ethan’s stuffed friends.  He insisted on being in the photos so here they are!  His favorite part seems to be the velcro.

Meadow Friends Baby Snuggler {chirpy threads}

xoxo, Jen

It’s a Spider!

Hello, there!  It’s been a while since I last posted, but I won’t go into detail as to why… Life pretty much just got in the way, and I was taken away from blogland.  Boo!  I know.  But Halloween is this week and I couldn’t go without sharing my first costume I made for Ethan!

He chose to be a spooky black spider and it sounded easy enough to sew up.  I was inspired by the one over at Pottery Barn Kids and wanted to make one similar.  This was a series of firsts for me… and it was an awesome experience!  I drafted the pattern on my own, made a muslin pattern, lined the costume, and sewed a hood!  Pretty cool, huh?  And, it turned out decent!

The legs didn’t turn out the way it’s supposed to but that’s ok.  I had wanted the legs to stick out and bend down, but I couldn’t figure out an easy and safe way to do it.  I tried floral wire but it was too sharp for a kid’s costume.  So I ended up just stuffing it with poly-fil and left it at that.  Aren’t I so original? This spider will just have skinny, floppy legs.  Super spoooooky!

It's a Spider! {chirpy threads}

The outer fabric is fleece (which I love sewing with because it’s so easy) and the lining is a knit jersey.  I lined the entire piece with knit and I loved how it felt inside!  Yup, and I used a plain old regular needle for this.  I had intended to buy a ball point needle after reading about sewing with knits but I completely forgot about it while at the fabric store.  But it turned out fine – no broken needles – yay!

It's a Spider! {chirpy threads}

I made fleece pants to go with the costume.  I used the Playground Longies pattern by Apple Dumpling Gear.  I’ve sewn this pattern up so many times.  It’s a super easy one.  And I just love the contrasting booty part – diaper or no diaper, it’s so comfy as play pants for little ones.  I left the bottom unhemmed because I didn’t realize how tall my munchkin was and made them a tad short.  Oh well, just glad that fleece doesn’t fray!

It's a Spider! {chirpy threads}

Ethan wanted green eyes – so he got them!  Actually, he wanted eight green eyes, which made total sense, but I didn’t feel like sewing eight eyes.  He settled.  Ah, it’s great to make things for him while he’s still so young.  He accepts my opinions… with a little bribe (or two).  Ha!

It's a Spider! {chirpy threads}

Happy Halloween, guys!  It feels so great to be back on here!

xoxo, Jen

Pretty Packaged Invitations

chirpy threads | pretty packaged invitations

A very awesome friend of mine is turning FORTY in a couple weeks and I volunteered to help design her party invitations.  I love doing these sorts of things!  She’s having a My Favorite Things party — and, I had no idea what that was until she explained it to me!  Then, I searched for it and found it everywhere, especially on Pinterest!  Wow, really, where have I been?  It’s super popular!

Anyway, I loved the idea of brown paper packages tied up with string.  It’s so simple, so classic, so PRETTY!

The invitations themselves were simple.  The wording came from here.  Just tweaked it a little bit.  The fonts I used are You Make Me Smile and Janda Curlygirl Chunky.

chirpy threads | pretty packaged invitations

Before I share with you the details of the packaging, a BIG shout out to my friend, the Silhouette Cameo!  Without you, I couldn’t have done it.

chirpy threads | pretty packaged invitations

The envelopes were photo sleeves.  The cards could easily be slipped in and out without having to pull apart the pretty string.  The design came in a 4″x6″ size so I resized it to fit the 5″x7″ invitations.  They were cut using the Silhouette.  I used Kraft card stock – my favorite!  They were so easy to put together.  Just fold on perforated lines, glue down tabs, and you have your envelope.

chirpy threads | pretty packaged invitations

The tags were also cut using the Silhouette.  This was a free design that was already in my library, so if you own a Silhouette, you should have it too!  I cut out the reinforcement circles out of Kraft cardstock for some cute contrast.  The names were each hand-stamped, letter by letter.

chirpy threads | pretty packaged invitations

Now for the wrapping… get some baker’s twine and wrap it around your envelope three times.  Then, insert one end through the hole of the tag and tie a bow.  Add a strip of washi tape on front of the envelope if you wish… and you’re DONE!

chirpy threads | pretty packaged invitations

Pretty and simple!  If you don’t have a Silhouette, you can find other pretty envelopes to wrap in string — it adds some charm and character to an otherwise boring piece of mail, don’t you think?!

xoxo, Jen

Superhero Birthday!

{chirpy threads} superhero birthday party

My little guy turned three last week and our superhero themed birthday bash turned out successful!  It was super fun.  And all those late nights of cape sewing were totally worth it. Totally.  But, since I waited until the week before the party to make my decorations, I didn’t get to everything I had planned on my list.  I managed to pull most of it off though!

So….. this was totally a cheater party….. shhh!  If you’re familiar with the Hostess with the Mostess blog (HWTM), you may recognize this theme.  Yup, I borrowed the theme from HWTM!   Actually, while perusing Pinterest, I came across Kelly Noel, who also borrowed ideas from HWTM.  I became so smitten by Kelly’s party that I borrowed most of her ideas!

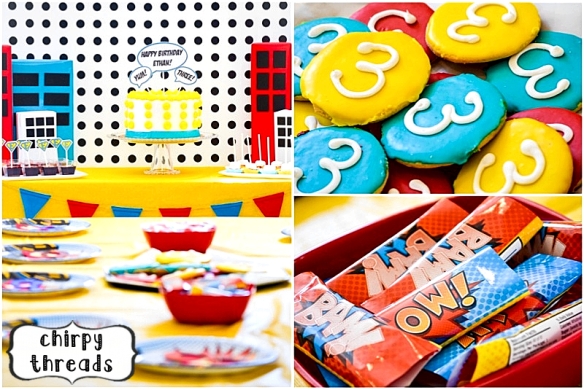
My focal point was going to be the cake and dessert table so I put in some really good effort into it!  I copied Kelly to a tee on the table backdrop.  The “Super E” shield was created using this font.  I made it as large as possible to fit on the turquoise and yellow cardstock I had on hand and used my Silhouette Cameo to cut it out.

{chirpy threads} superhero birthday party

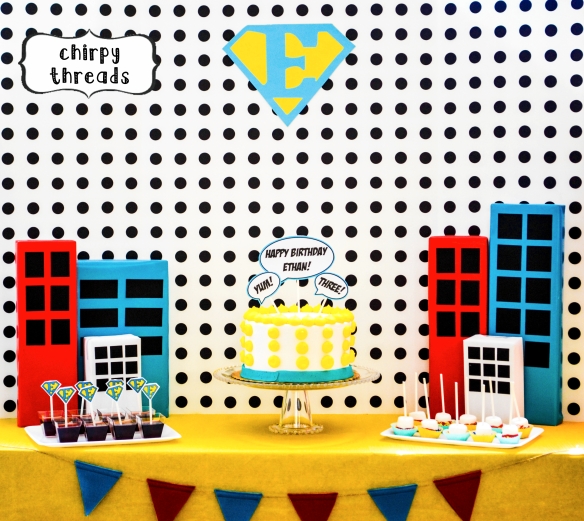
I bought a foam tri-fold display board from Michaels (with a coupon, of course!) and used my Silhouette Cameo to cut out 1-inch circles (408 to be exact – wow) out of black cardstock.  Then, off to sticking all the dots I went!  This was a tremendously tedious task that took a few hours total I think.  I had the hubby help out and we sort of had an assembly line going!  I used my large Omnigrid ruler for placement and double-sided tape to adhere them to the board.  I was afraid the dots wouldn’t be aligned properly so I needed something that was less permanent than glue.  And I gotta say, I think the tape method worked like a charm!  I so love that stuff.

{chirpy threads} superhero birthday party :: dessert table

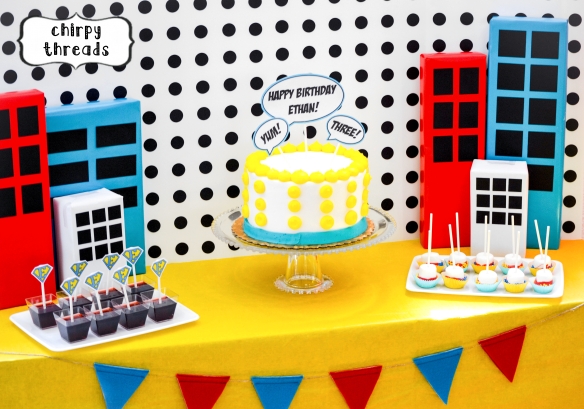
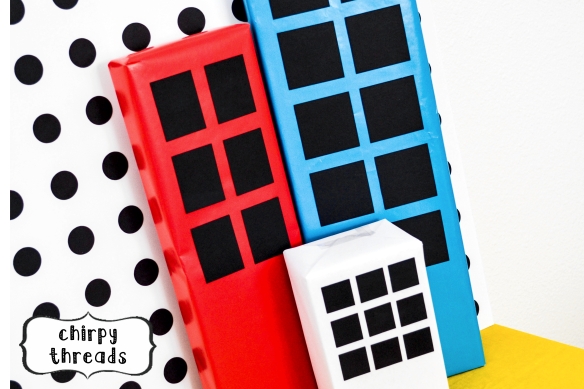
The buildings were boxes I found around the house (some empty, some not) that I wrapped with solid colored wrapping paper I found at Party City.  I used my Silhouette Cameo again to cut out squares and rectangles out of black cardstock and then stuck them to the boxes with double-sided tape.  My best-looking tower was two boxes of flash cards that I stacked together and wrapped – they were the perfect skinny size I needed!

{chirpy threads} superhero birthday party :: buildings

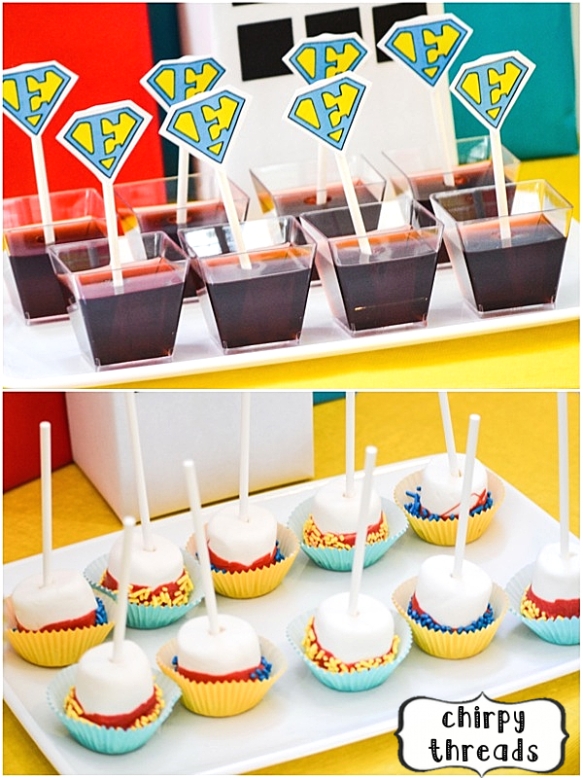
The jello didn’t quite turn out the color I wanted but I still used it – no one probably cared but me anyhow!  It was a black cherry flavor and the color on the box was red.  Really, it was!  I was fooled.  It ended up being a very dark purple color.  Oh well!  I printed out a bunch of tiny “Super E” shields and taped them to lollipop sticks.  Then, poked them through the (dark!) jello to make them look pretty.  The marshmallow pops were dunked in melted red chocolate and then dipped in turquoise and yellow sprinkles.  This is where I screwed up… I totally meant to tape some flags with superhero words on the sticks but forgot about them during the big morning setup rush!

{chirpy threads} superhero birthday party :: desserts

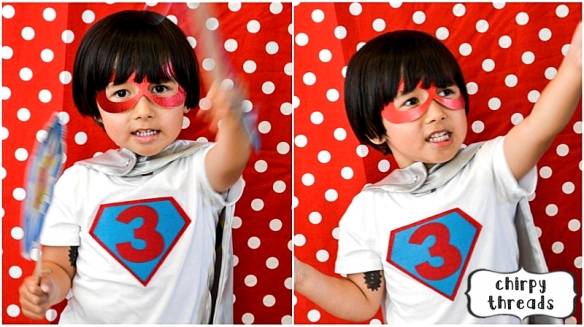
I set our dining table with these cute “POW” paper plates purchased from Birthday Express.  The plates were topped with shiny eye masks and super shields with each kid’s first initial.  I made eye masks using this template.  I bought some shiny textured cardstock from Michaels and cut the masks out again using the Silhouette.  I then tied a thin elastic cord to them.  The super shields were cut out from red adhesive-backed felt.  I used heat n’ bond on yellow fabric, cut out each letter, and ironed them onto the red felt shields.  The idea was to use them as “stickers”.  I had asked each kid to wear a white (or solid-colored shirt) to the party so that they can adorn their shirts with the shield and other felt tickers.  I made Ethan’s shield slightly larger with a number three on it and sewed it onto his t-shirt.

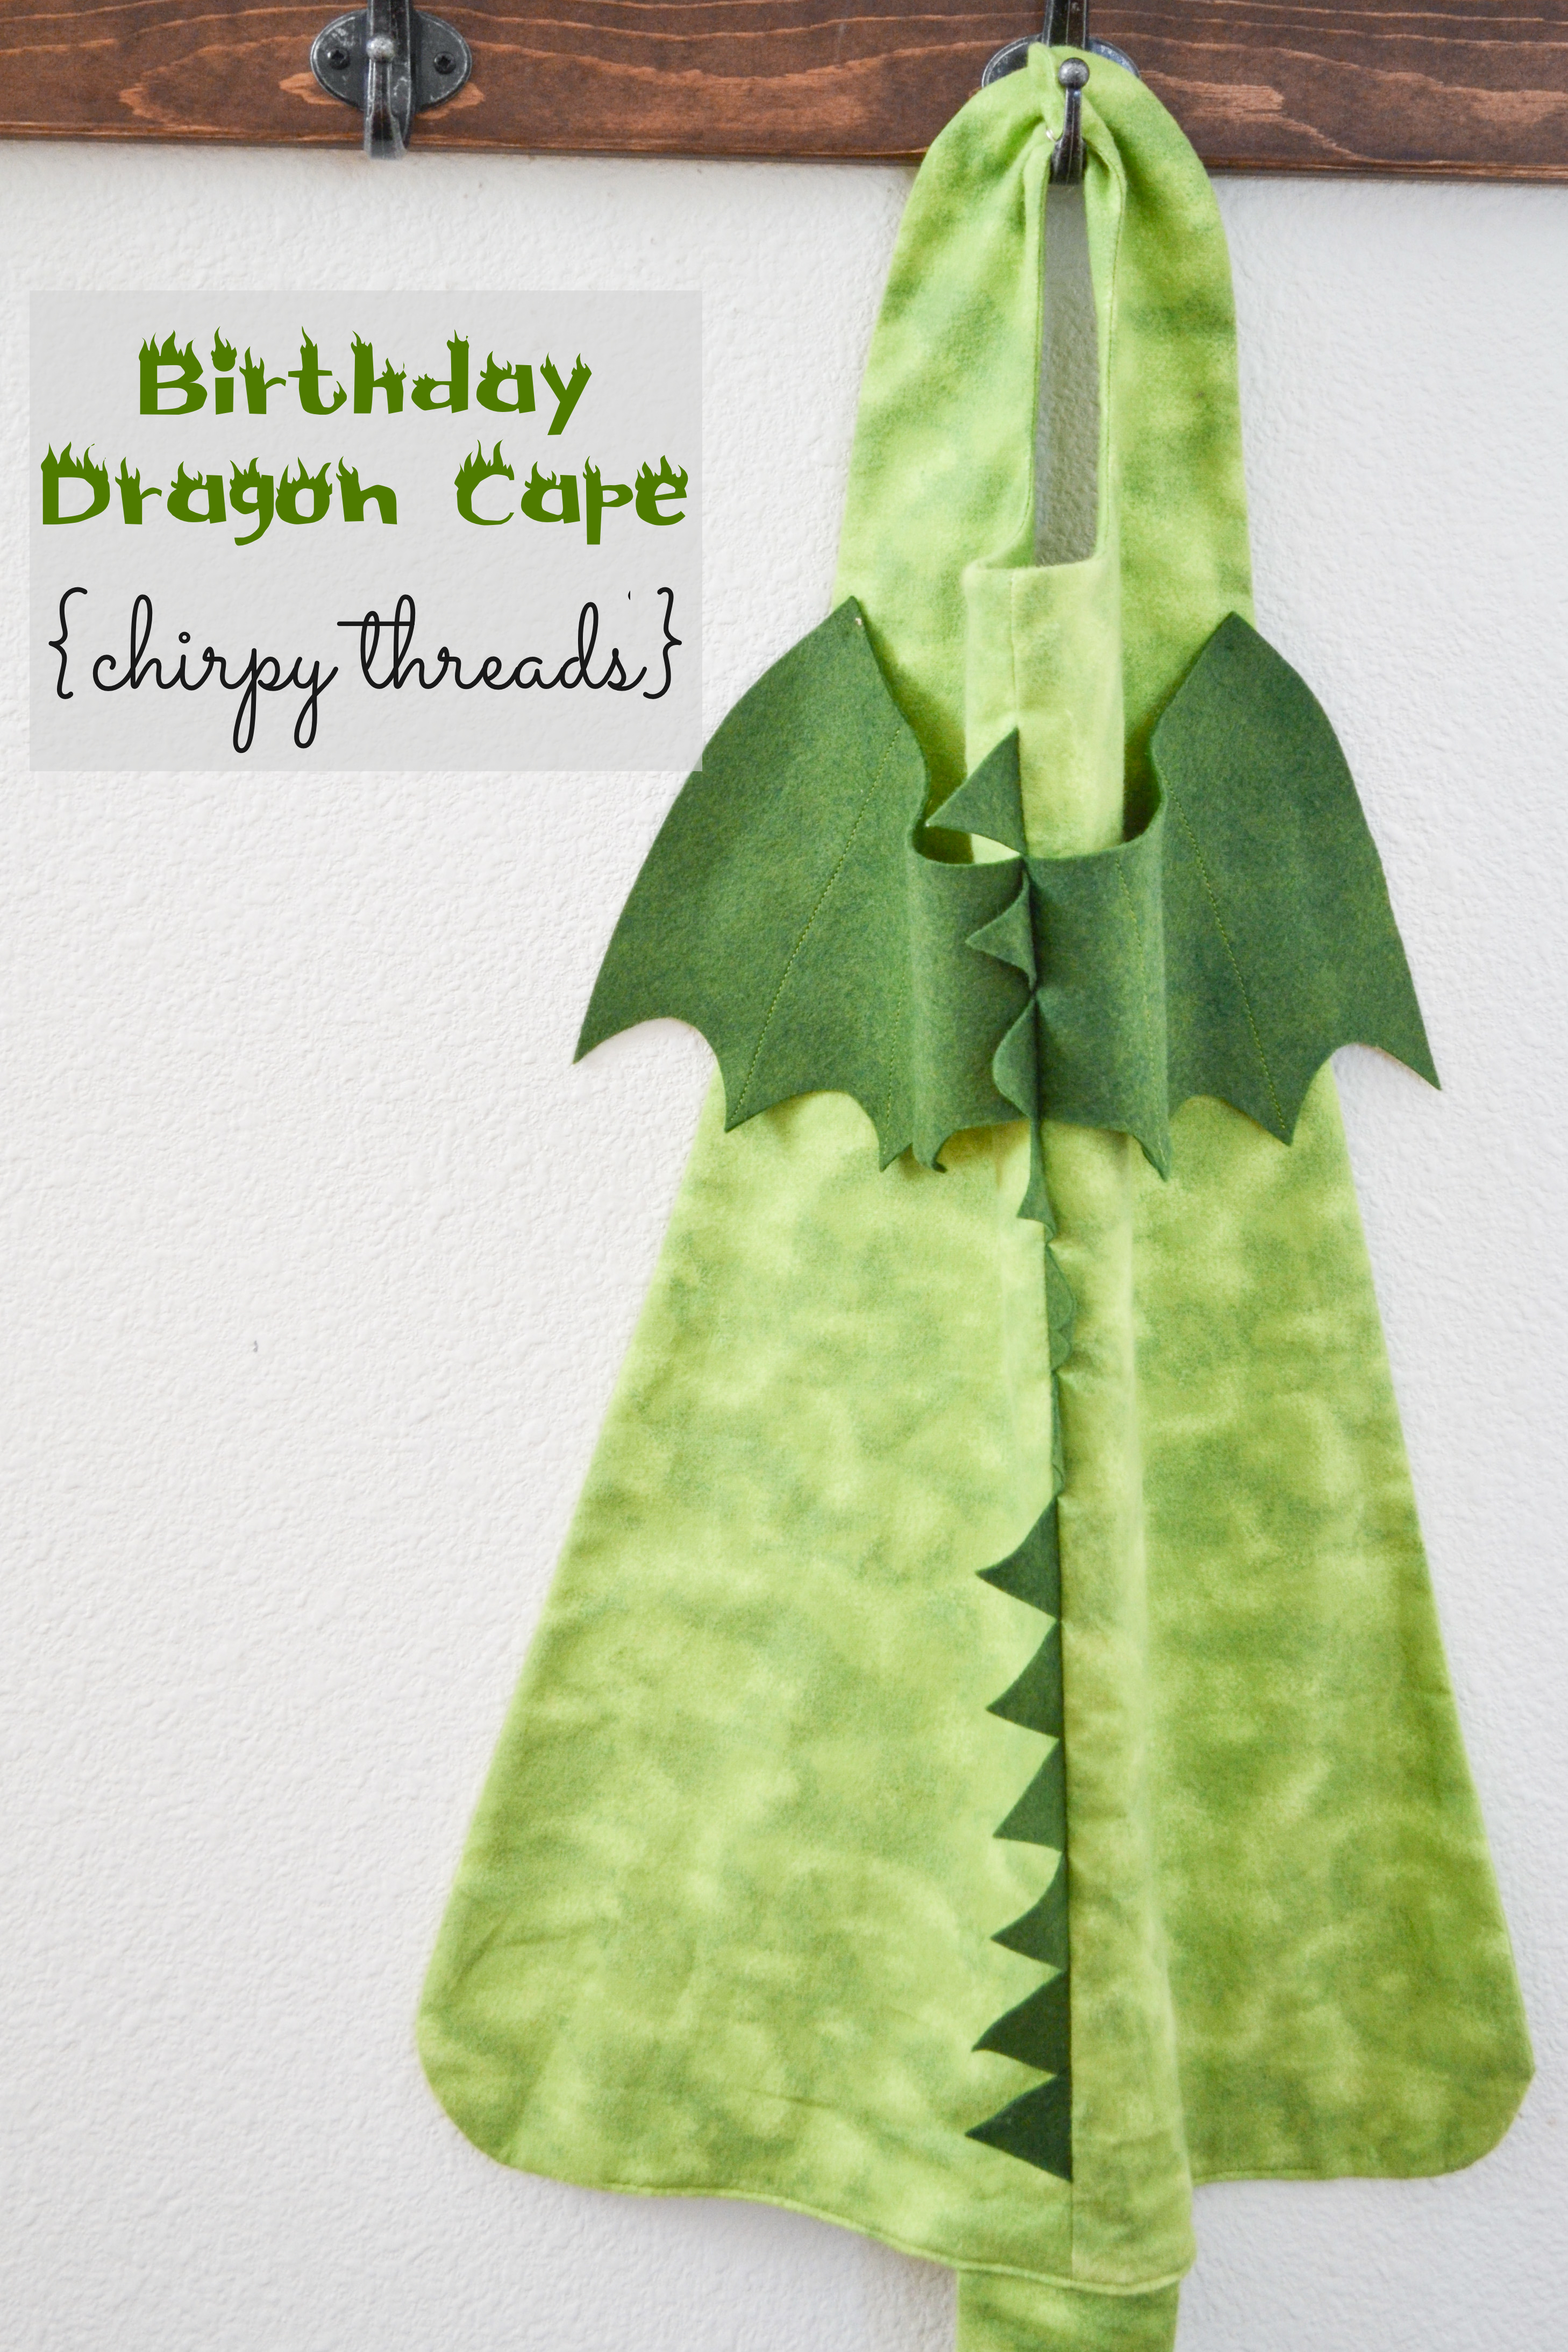
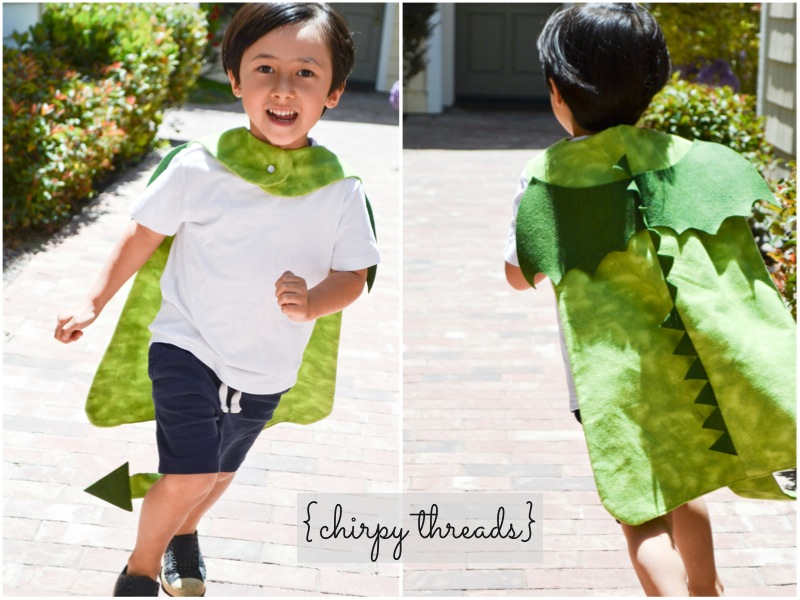
Guests were greeted with capes when they entered the house.  Yup, these were the capes that kept me up the whole week!  The hubby commented that my work area looked like a factory!  I loved how they turned out though.  The birthday boy had the shiny cape and all the other kids had solid colored cotton ones.  I tried my best to use fabric that I already had in my stash.  I used this pattern again to make each cape, all in different sizes.  But I used only one snap button on each cape rather than the two instructed.  I appliquéd a star inside a circle for each kid to keep it simple.  Yes, I had plans to sew each kid’s first initial on at first, but decided it was too much work in the end!

{chirpy threads} superhero birthday party :: capes and masks

I also purchased these cute candy wrappers from Birthday Express and stuck them to snack sized Kit Kat Bars.  Cookies with the number three on them were also placed on the table for little hands to grab.  The cookies were purchased from Beckers Bakery, a local bakery in Manhattan Beach, CA.

{chirpy threads} superhero birthday party :: sweets

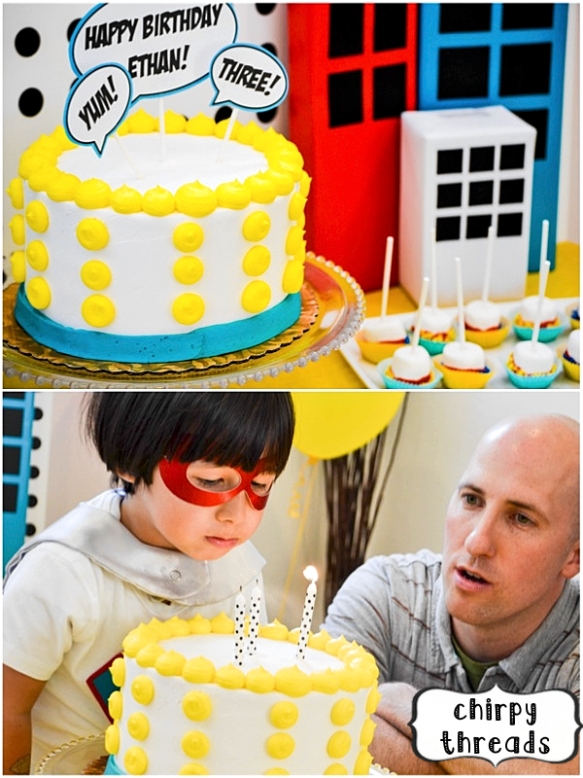
The birthday cake was also purchased at Beckers Bakery.  It was soooooo delicious!  I love the giant icing balls they put on it.  I created the three cake toppers on PowerPoint and printed them out on white cardstock, then stuck it onto turquoise cardstock to give it a contrasting border.  They were then taped to lollipop sticks.  Love how they adorned the cake!  The polka-dotted candles were from Sur La Table.

{chirpy threads} superhero birthday party :: birthday cake

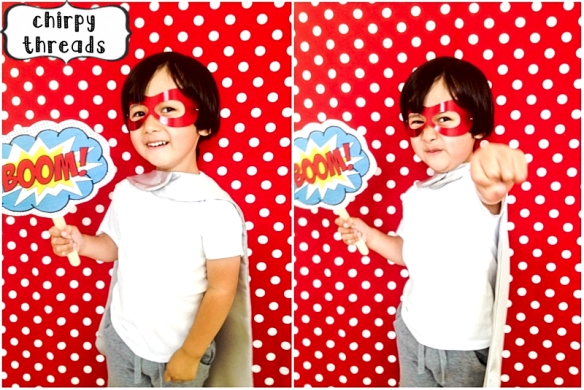
And my favorite part of the party was probably the little photo booth area for pictures!  I purchased a few yards of red and white polka-dotted fabric from Joann and draped it over two foam boards that I taped together.  I made a burlap “photo” banner and attached it to the top of the fabric board.  The letters are fabric that I fused onto the burlap using heat n’ bond and cut on my Silhouette Cameo.

{chirpy threads} superhero birthday party :: backdrop

{chirpy threads} superhero birthday party :: backdrop

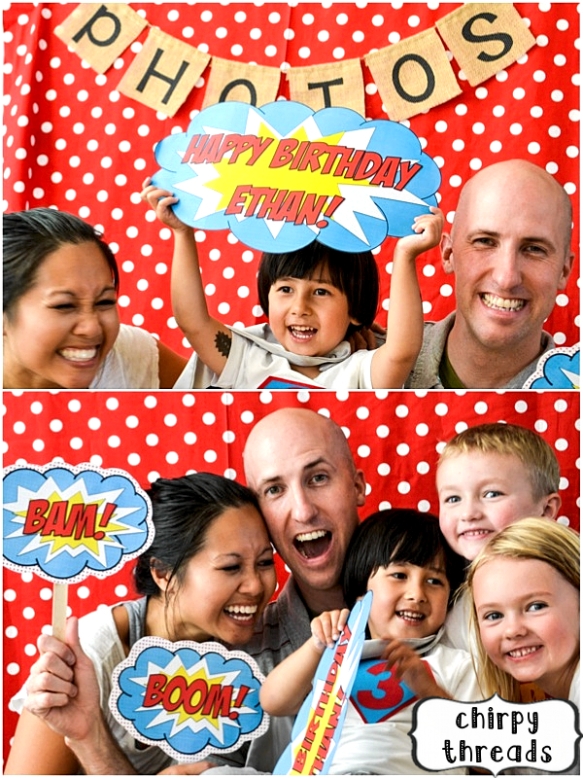
I made these superhero props for the photos.  I designed the images on PowerPoint and printed them out on cardstock, cut them out and glued them to large popsicle sticks.  They were so much fun and really added to the photos!  Feel free to use them for personal use if you’d like!

{chirpy threads} superhero birthday party :: backdrop

I didn’t have many activities planned out for the kids.  I figured three-year-olds would rather roam free and play as they wished.  I put out some markers, stickers, and little superhero character notecards on the “craft table” and let the crafty ones go to town.  The notecards can be found here – they are super cute (and all hand drawn too!).

{chirpy threads} superhero birthday party :: activities

I also put out temporary tattoos for the kids.  I love these little callout signs!  I probably would have attached them to everything if I had the time!  I made them the same way as the cake toppers.

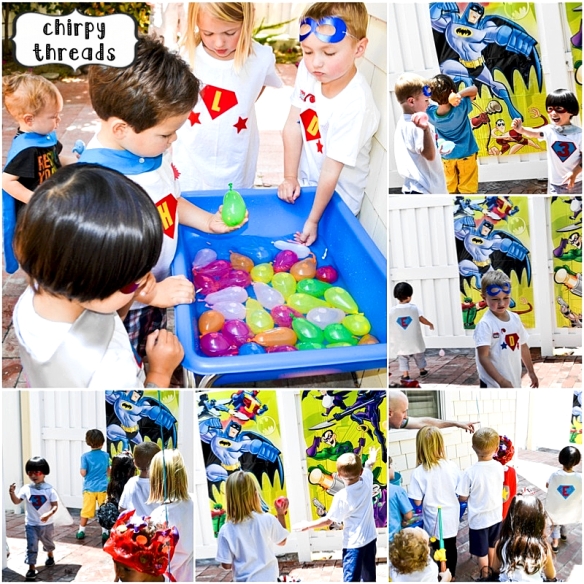
Outside, we taped up some superheroes and villains posters and had kids throw water balloons at them.  Super simple and kids loved them.  Although some of the kids got soaked!  Sorry, parents!

{chirpy threads} superhero birthday party :: activities

Lastly, I had other various decorations around the house that I wanted to share with you.  I hung up some of Ethan’s Batman books on a string as decoration.  Thought it looked cute! I framed this awesome happy birthday subway art and also designed my very own “welcome all superheroes!” art.  Feel free to use it for personal use.

{chirpy threads} superhero birthday party :: decorations

And BOOM!  There you have it — my little superhero’s third birthday party!  Thanks for stopping by!

{chirpy threads} superhero birthday party :: backdrop

xoxo, Jen