Dragon Birthday Party

dragon birthday party {chirpy threads

Oh man… sooooo… even though this birthday party took place FIVE months ago, I am still going to blog about the details!  Cool?  Cool.  Better late than never, right?  Actually, I really needed to post this blog entry before I could move on… I couldn’t bring myself to blog about any other project until I blogged about this ancient party.  Ha!   And, of course, it’s to hopefully inspire anyone who’s kids are into dragons and wants to throw them a dragon party!  But seriously, I have sooooo many completed projects lined up and ready to be shared.  Yikes!

I also wanted to share what I’ve been working on these past few months… I’ve been working hard!  Really, I have!  I’ve made a few play things for Ethan, sewn up gifts for friends, and have been trying to build an Etsy shop.  YUP!  I’m going to start up an Etsy shop with a friend very soon!  It’s been so exciting working out all the fine details of the little shop.  More on this to come!  Oh, and I completed Ethan’s Halloween costume last week — yes, I really wanted to share the costume I made so I need to finally get the birthday stuff out of the way.  So, without further ado… let’s get back to the dragon party!!

dragon birthday party {chirpy threads

My Ethan turned FOUR way back in May and the theme he close was dragons – like, the scary kind.  You know, fire-breathing dragons!  Um… ok, we can have a scary dragon party but still make it cute, right?  Four-year-olds are still babies, right?!  *sigh*.  Hopefully, this isn’t the last year I can plan a party with a little cuteness.  I still can’t get over how fast my son is growing up.

dragon birthday party {chirpy threads

I can usually find good party inspiration on the internet but discovered that dragon birthday parties were pretty rare.  So I got to thinking – and thought scales and dragons and lots of green would work.  I made a dragon scale backdrop and decided that the the cake table would be the the main focus.  For the backdrop, I reused the foam display board from last year’s superhero birthday party and cut out a TON of fabric “scales” in three shades of green, and stuck them onto the board with double-sided tape, slightly overlapping each one.  And boy oh boy, this was truly a labor of love!  I divided this task into several days/nights, working on it whenever I was in the right mood.  But it turned out so cute, so it was worth every sleepless night!  The burlap happy birthday banner was made a couple years ago and it sort of fit the rustic-like theme so I reused it here.  The dragon cake is from Torrance Bakery (a local bakery here in SoCal) – they did such a fantastic job!  I also tried to find as much green sweets as I could – hence, the green gummy bears, jelly beans, and yogurt pretzels! Ha!

dragon birthday party {chirpy threads}dragon birthday party {chirpy threads}

Ahh, I’d have to say my favorite part of the party was the paper mache dragon eggs! These, my friends, were another true labor of love as well!  My scissors, tissue paper, and mod podge were my besties for several days.  I got my inspiration and tutorial for these eggs here.  I made a few eggs each for all the kids and put treats and little toy dragons inside them for the big “dragon egg hunt”.  I also made a wood “dragon egg hunt” sign using some cheap plywood and stick I got at a craft store.  Man, this activity was so much fun for the kids!

dragon birthday party {chirpy threads}dragon birthday party {chirpy threads}

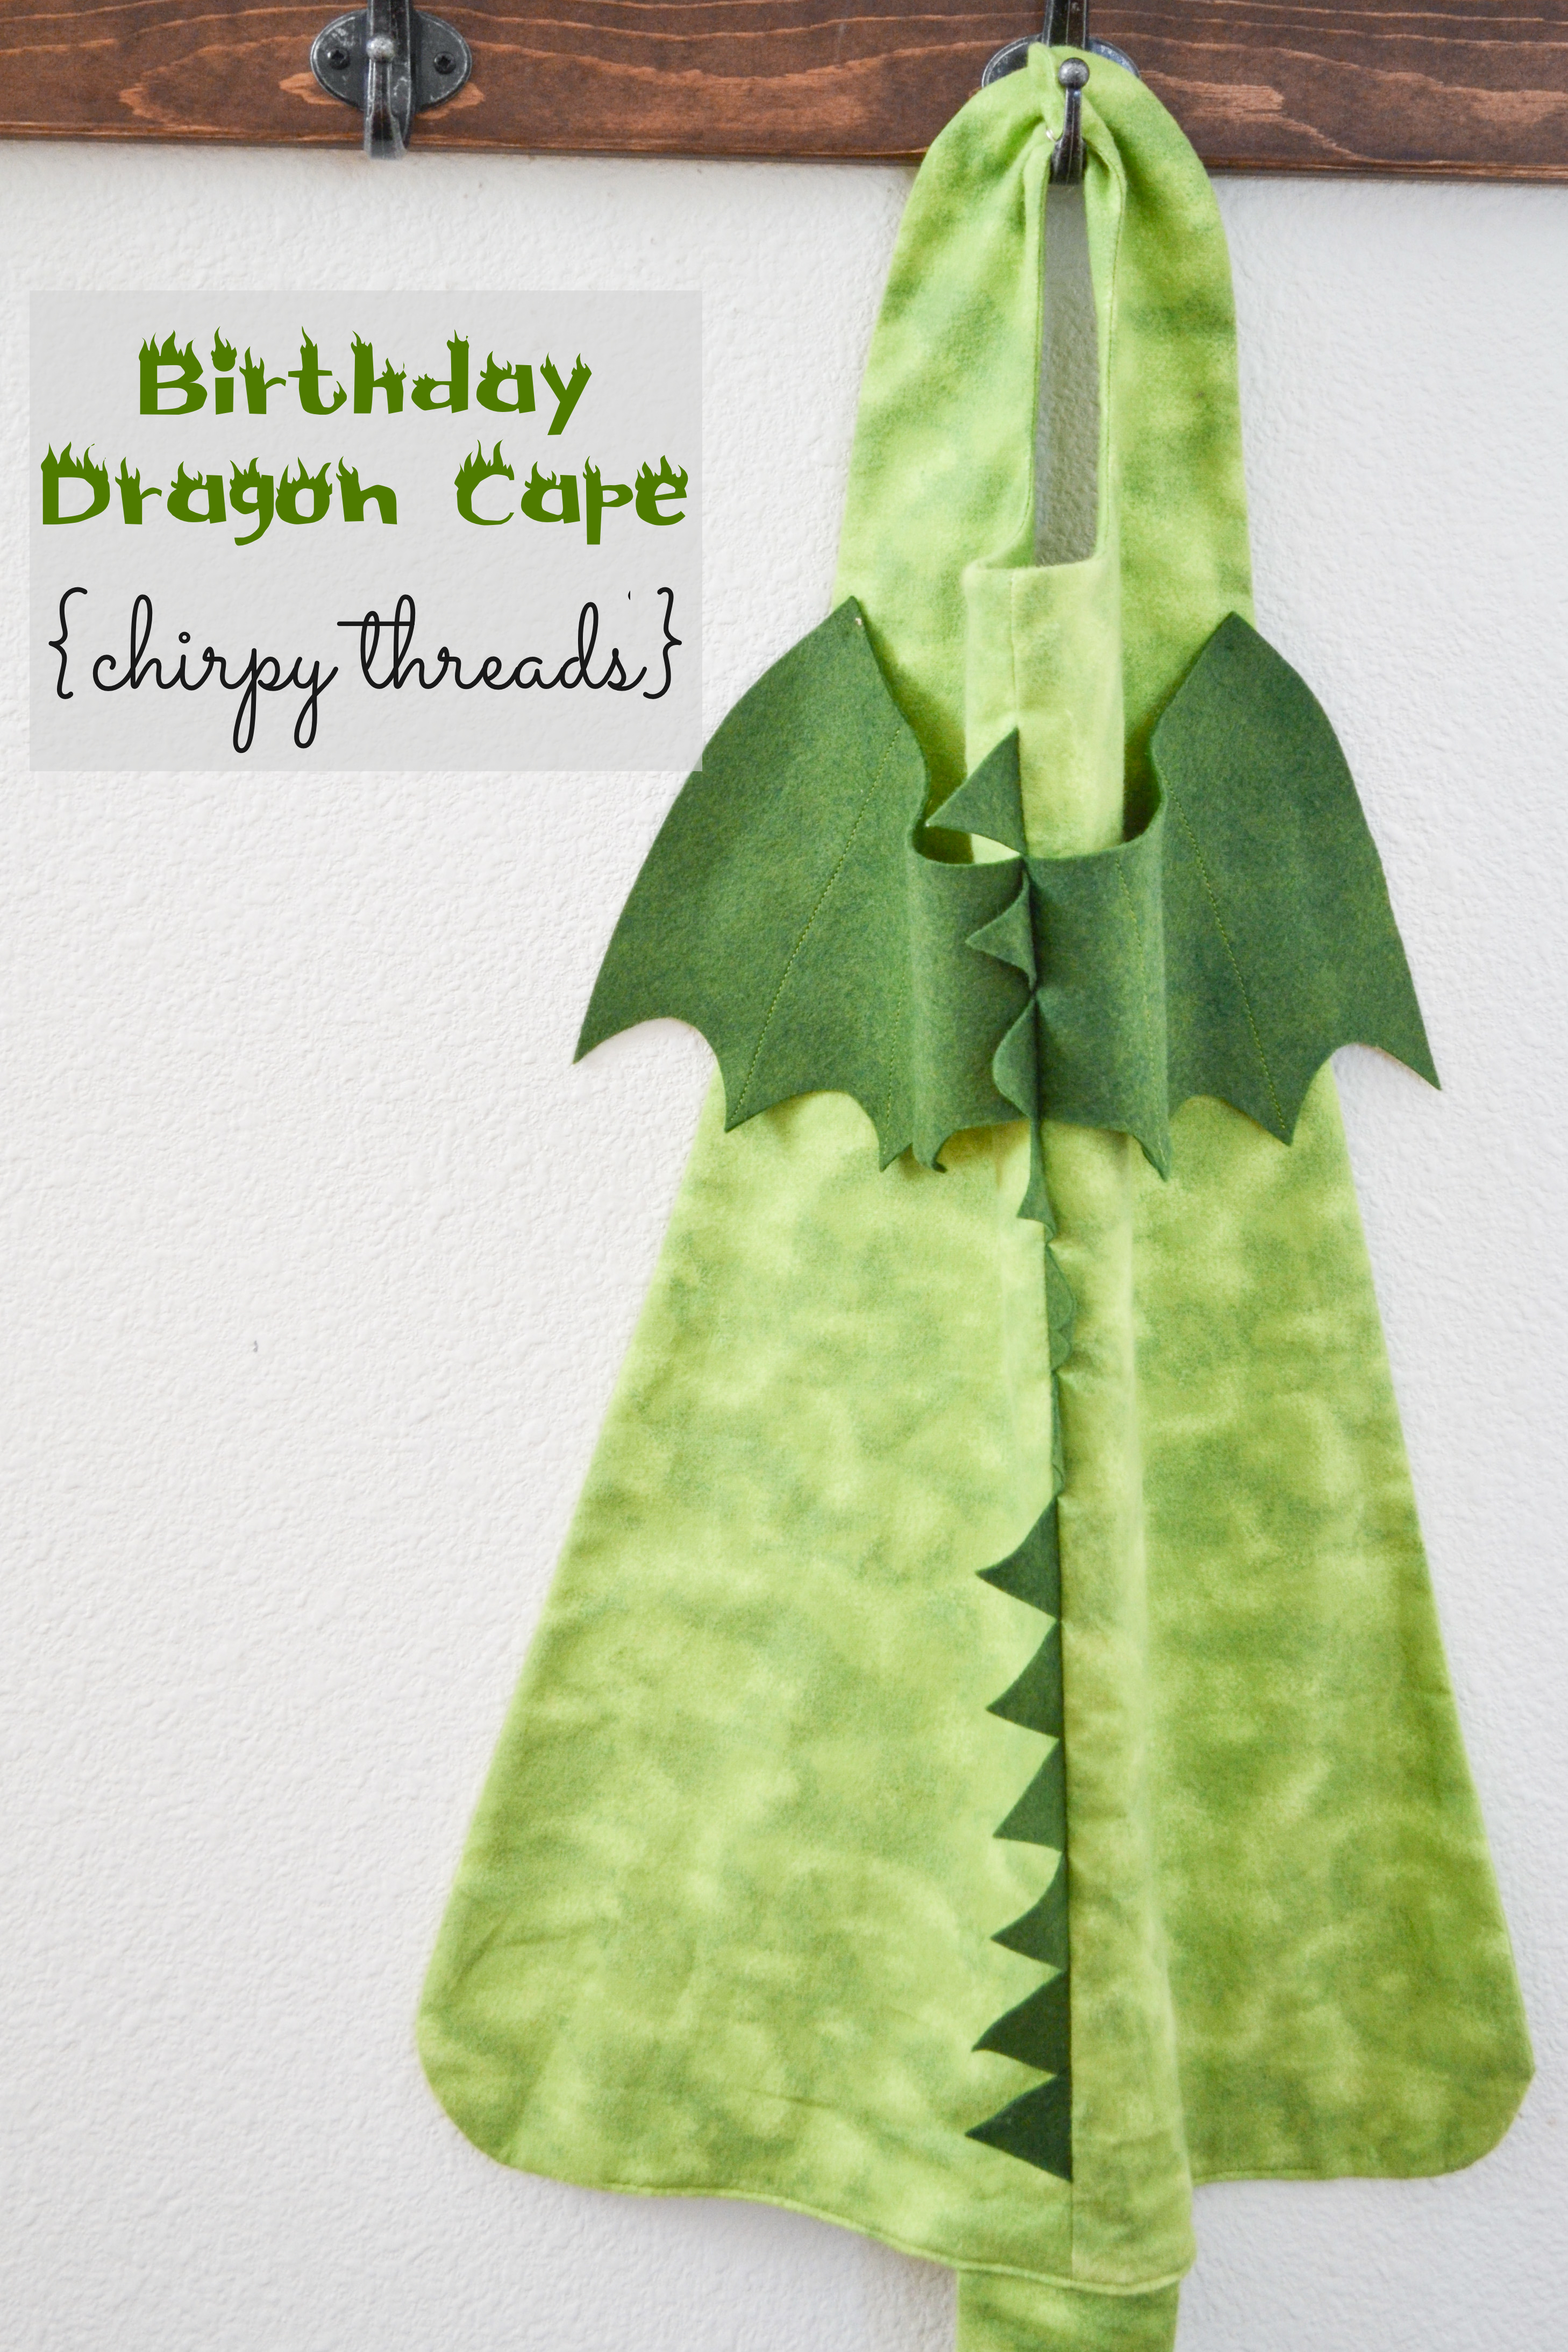
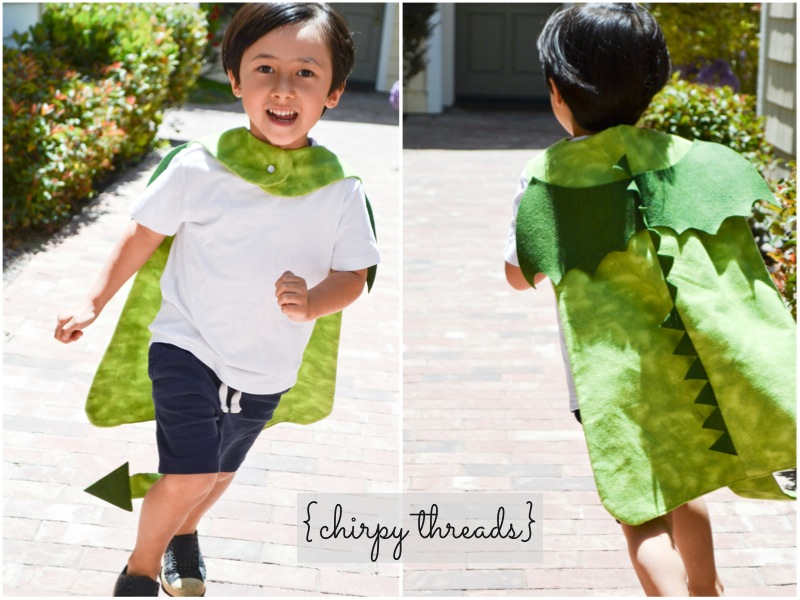
I kept the other decorations very simple.  I created a few dragon prints on good old PowerPoint using the images I purchased over at poppydreamz on Etsy.  I also made the party invitations using these cute dragon images.  I blogged about that as well as Ethan’s dragon cape here.  The multi-shades-of-green pennant garlands were made using card stock and twine – super easy and adds a bit of festive flair!  I bought wooden utensils from Amazon and used washi tape to dress up the ends for a pop of color.

I forgot to mention that I wanted to add a bit of woodsiness to the party as well – I’m sure you can sort of tell from the photos?  Maybe?  I used these wood chargers that I had as well as these wood bark coasters, all from World Market – love that store!

dragon birthday party {chirpy threads}dragon birthday party {chirpy threads}dragon birthday party {chirpy threads}

Mmm.  Don’t those cookies look yummy?  These ahh-mazing dragon cookies were made by my friends over at Two Sweet and Crafty.  These women are so talented!  If only I could bake… maybe someday I’ll try my hand at it.  But for now, I think I will just stick to sewing!

dragon birthday party {chirpy threads}

And finally, the photo booth area!  I thought a stone/rocky background would be appropriate for dragons.  The backdrop is from here.  That fire-y looking cup that Ethan is blowing into was another craft I had set out on the kids’ table.  It’s a green paper cup with the bottom cut out and strips of red and orange tissue paper glued around the perimeter of the top.  It’s supposed to be the “fire” for all the “fire-breathing” dragons!  🙂

dragon birthday party {chirpy threads}

And that’s all I have for now, folks!  Now, I can finally move on and share with you Ethan’s costume!  I can’t believe Halloween is THIS week!  Why is it the end of October already?!

xoxo, Jen

Birthday Dragon Cape and Party Invitation

birthday dragon cape {chirpy threads}

We celebrated Ethan’s 4th birthday last weekend with a dragon themed party and it was so much fun!  He had been really into dragons for awhile and chose the theme a few months ago… and, much to my surprise, stuck with it without changing his mind.  And so… I had to make him a dragon cape!  Yup.  And guess what?  He loved it!  That always puts a smile on my face.

birthday dragon cape {chirpy threads}

Once again, I used the superhero cape pattern by Georgia Leigh, in a size 4.  I cut the cape in half to add some little felt triangle spikes and wings that I loosely drafted by looking at an old dragon costume that Ethan wore two halloweens ago.  I also attached a tail to the bottom of the cape.  Both the green tie-dyed flannel fabric and forest green felt came from Joann.

birthday dragon cape {chirpy threads}

I had to hand stitch the wings to the cape at the top to keep it from flopping down.  I also sewed some vertical lines on the wings to make it appear more dragon-like.  Not sure if it worked though – people kept asking if he was a dinosaur!  Um, dinosaurs do not have wings!  Come on now, people!  Haha!

birthday dragon cape {chirpy threads}

birthday dragon cape {chirpy threads}

birthday dragon cape {chirpy threads}

DSC_0142 EditedCT

I love this pattern so much.  It’s so versatile – and, as you can see, it’s not just for superheroes!  I’ve used it many times (herehere, and here) and with different types of fabric!

Anyway, back to the party… this is the invitation that I created for Ethan’s birthday party!  I bought a set of dragon images from this Etsy shop.  The dragon, cake, presents, and stars are from this set which was customized for me.  I put together the invitation on PowerPoint and made the tower and flag banner using the shapes on the program.  The fiery font I used is called flames and can be found and downloaded here for free.

dragon birthday invitation {chirpy threads}

Details of the party to follow very soon!

xoxo, Jen

Superhero Birthday!

{chirpy threads} superhero birthday party

My little guy turned three last week and our superhero themed birthday bash turned out successful!  It was super fun.  And all those late nights of cape sewing were totally worth it. Totally.  But, since I waited until the week before the party to make my decorations, I didn’t get to everything I had planned on my list.  I managed to pull most of it off though!

So….. this was totally a cheater party….. shhh!  If you’re familiar with the Hostess with the Mostess blog (HWTM), you may recognize this theme.  Yup, I borrowed the theme from HWTM!   Actually, while perusing Pinterest, I came across Kelly Noel, who also borrowed ideas from HWTM.  I became so smitten by Kelly’s party that I borrowed most of her ideas!

My focal point was going to be the cake and dessert table so I put in some really good effort into it!  I copied Kelly to a tee on the table backdrop.  The “Super E” shield was created using this font.  I made it as large as possible to fit on the turquoise and yellow cardstock I had on hand and used my Silhouette Cameo to cut it out.

{chirpy threads} superhero birthday party

I bought a foam tri-fold display board from Michaels (with a coupon, of course!) and used my Silhouette Cameo to cut out 1-inch circles (408 to be exact – wow) out of black cardstock.  Then, off to sticking all the dots I went!  This was a tremendously tedious task that took a few hours total I think.  I had the hubby help out and we sort of had an assembly line going!  I used my large Omnigrid ruler for placement and double-sided tape to adhere them to the board.  I was afraid the dots wouldn’t be aligned properly so I needed something that was less permanent than glue.  And I gotta say, I think the tape method worked like a charm!  I so love that stuff.

{chirpy threads} superhero birthday party :: dessert table

The buildings were boxes I found around the house (some empty, some not) that I wrapped with solid colored wrapping paper I found at Party City.  I used my Silhouette Cameo again to cut out squares and rectangles out of black cardstock and then stuck them to the boxes with double-sided tape.  My best-looking tower was two boxes of flash cards that I stacked together and wrapped – they were the perfect skinny size I needed!

{chirpy threads} superhero birthday party :: buildings

The jello didn’t quite turn out the color I wanted but I still used it – no one probably cared but me anyhow!  It was a black cherry flavor and the color on the box was red.  Really, it was!  I was fooled.  It ended up being a very dark purple color.  Oh well!  I printed out a bunch of tiny “Super E” shields and taped them to lollipop sticks.  Then, poked them through the (dark!) jello to make them look pretty.  The marshmallow pops were dunked in melted red chocolate and then dipped in turquoise and yellow sprinkles.  This is where I screwed up… I totally meant to tape some flags with superhero words on the sticks but forgot about them during the big morning setup rush!

{chirpy threads} superhero birthday party :: desserts

I set our dining table with these cute “POW” paper plates purchased from Birthday Express.  The plates were topped with shiny eye masks and super shields with each kid’s first initial.  I made eye masks using this template.  I bought some shiny textured cardstock from Michaels and cut the masks out again using the Silhouette.  I then tied a thin elastic cord to them.  The super shields were cut out from red adhesive-backed felt.  I used heat n’ bond on yellow fabric, cut out each letter, and ironed them onto the red felt shields.  The idea was to use them as “stickers”.  I had asked each kid to wear a white (or solid-colored shirt) to the party so that they can adorn their shirts with the shield and other felt tickers.  I made Ethan’s shield slightly larger with a number three on it and sewed it onto his t-shirt.

Guests were greeted with capes when they entered the house.  Yup, these were the capes that kept me up the whole week!  The hubby commented that my work area looked like a factory!  I loved how they turned out though.  The birthday boy had the shiny cape and all the other kids had solid colored cotton ones.  I tried my best to use fabric that I already had in my stash.  I used this pattern again to make each cape, all in different sizes.  But I used only one snap button on each cape rather than the two instructed.  I appliquéd a star inside a circle for each kid to keep it simple.  Yes, I had plans to sew each kid’s first initial on at first, but decided it was too much work in the end!

{chirpy threads} superhero birthday party :: capes and masks

I also purchased these cute candy wrappers from Birthday Express and stuck them to snack sized Kit Kat Bars.  Cookies with the number three on them were also placed on the table for little hands to grab.  The cookies were purchased from Beckers Bakery, a local bakery in Manhattan Beach, CA.

{chirpy threads} superhero birthday party :: sweets

The birthday cake was also purchased at Beckers Bakery.  It was soooooo delicious!  I love the giant icing balls they put on it.  I created the three cake toppers on PowerPoint and printed them out on white cardstock, then stuck it onto turquoise cardstock to give it a contrasting border.  They were then taped to lollipop sticks.  Love how they adorned the cake!  The polka-dotted candles were from Sur La Table.

{chirpy threads} superhero birthday party :: birthday cake

And my favorite part of the party was probably the little photo booth area for pictures!  I purchased a few yards of red and white polka-dotted fabric from Joann and draped it over two foam boards that I taped together.  I made a burlap “photo” banner and attached it to the top of the fabric board.  The letters are fabric that I fused onto the burlap using heat n’ bond and cut on my Silhouette Cameo.

{chirpy threads} superhero birthday party :: backdrop

{chirpy threads} superhero birthday party :: backdrop

I made these superhero props for the photos.  I designed the images on PowerPoint and printed them out on cardstock, cut them out and glued them to large popsicle sticks.  They were so much fun and really added to the photos!  Feel free to use them for personal use if you’d like!

{chirpy threads} superhero birthday party :: backdrop

I didn’t have many activities planned out for the kids.  I figured three-year-olds would rather roam free and play as they wished.  I put out some markers, stickers, and little superhero character notecards on the “craft table” and let the crafty ones go to town.  The notecards can be found here – they are super cute (and all hand drawn too!).

{chirpy threads} superhero birthday party :: activities

I also put out temporary tattoos for the kids.  I love these little callout signs!  I probably would have attached them to everything if I had the time!  I made them the same way as the cake toppers.

Outside, we taped up some superheroes and villains posters and had kids throw water balloons at them.  Super simple and kids loved them.  Although some of the kids got soaked!  Sorry, parents!

{chirpy threads} superhero birthday party :: activities

Lastly, I had other various decorations around the house that I wanted to share with you.  I hung up some of Ethan’s Batman books on a string as decoration.  Thought it looked cute! I framed this awesome happy birthday subway art and also designed my very own “welcome all superheroes!” art.  Feel free to use it for personal use.

{chirpy threads} superhero birthday party :: decorations

And BOOM!  There you have it — my little superhero’s third birthday party!  Thanks for stopping by!

{chirpy threads} superhero birthday party :: backdrop

xoxo, Jen

Birthday on the Brain…

Well, hello there!  I’ve completely skipped a month on here.  It’s been that busy.  Ahhh.  I had my family visiting us from the east coast in April and it was so much fun showing them around Los Angeles.  But as soon as they left, I began to freak out a little.  Just a little.  Maybe a lot.

My baby’s birthday was around the corner and I hadn’t a clue what I was going to do for him.  I had toyed with a few ideas throughout the year, but didn’t have anything firm.  Ethan is really into Batman.  I mean really into it.  He loves pretending he’s a superhero.  I hear about his adventures everyday.  It’s so adorable.  But gosh, it’s so big boyish!  He’s a little dude now.  And he’s not even three yet!  I had envisioned his third birthday party to be cute and sweet… you know, still sort of a babyish type party.  Nope, not for Ethan.  No spring theme, no animal theme, no nautical theme.  None of that.  He insisted on a Batman party.  Ok, we can make that work — a cute, vintage superhero party!

So off to pinning I went… every night, I would spend hours perusing the many superhero themed birthday parties on Pinterest.

So there you have it!  I had birthday on the brain for the last few weeks and was on party planning mode (aka pinning mode).  But, I did create an invitation!  Nothing fancy.  I used PowerPoint to create it.

{chirpy threads} superhero birthday invitation

And, I also made a shiny superhero cape for Ethan!  The first one I made him last year was a little short, so I added an inch to this one.  Should have added more length though.  Oh well!  It’s still pretty darn cute, I think!  It was also my first time sewing with satin.  I nearly ruined my machine!  For some reason, I thought I needed a special needle for satin.  I thought a sharper Microtex needle would work.  Um, nope!  Don’t ever use a Microtex needle with satin!  It kept pulling all the threads out of the material.  So there’s my tip of the day!

{chirpy threads} reversible batman superman cape

And that’s all I’ve done so far… sadly.  Less than two weeks left!  I need to zoom into action quick!  Wish me luck!

xoxo, Jen

Personalized Felt Gift Bag

We had another birthday party for Ethan and his friends this past weekend.  It was a joint party for six kids who were all turning two in the months of May or June.  Since we know so many kids who are all the same age, it was appropriate to throw one big bash for everyone together.  Each kid would receive one birthday gift from one friend rather than five.  Doesn’t that make so much sense?  Otherwise, we’d we broke buying gifts for everyone each week!

We agreed to list the kids’ names in alphabetical order;  the first on the list would buy for the second, the second would buy for the third, etc.  It all worked out perfectly.

Since I had so much felt in my fabric stash, I decided to make a gift bag out of it.  I know every kid loves to rip open paper from presents but I really wanted to make a bag that was eco-friendly and reusable!  It was super easy too.

I chose the colors blue and green for a boy.  I made the bag striped because I just love stripes but you can make it one solid color too. I also chose to personalize it with the birthday boy’s name.

I didn’t take a whole lot of pictures because I made it last minute but I’ll quickly give a brief tutorial.  I didn’t take down the exact measurement of the bag but I think it was about 11.5″ x 17.5″.  Although a little snug (as you can see from the photo above), it was large enough to fit a hardcover book and boxed toy.  I would have made it bigger if I wasn’t in such a rush!  This is really just one big pouch. 🙂

Materials:

  • four felt craft sheets (approximately 9″ x 12″ – found at any craft store)
  • heat’n bond lite (for letter appliques)
  • string for the drawstring
  • the essentials – sewing machine, scissors, thread

Cut your felt sheets in half horizontally (so you should have strips that are approximately 4.5″ x 12″).  You should have a total of eight strips now (four of each color).  Then take two of the strips (different colors) and put one on top of the other.  Sew one of the long edges together.  I used a 1/4″ seam allowance.

Keep doing this so you end up with a block of four strips.  This will be the front side of the bag.  Do the same for the the back side.

If you’d like to personalize it like I did, the next step is to applique your letters. I had fused heat n’bond to an oatmeal colored felt sheet, then cut out my letters from the two layers.  Iron on the letters to the front side of your bag and sew them on.

Now you are ready to sew the bag together.  Fold down the top of both front and back pieces of the bag about 3/4 inches and sew.  This will create a pocket to hold your drawstring.  Next, place front and back pieces right sides together and sew along the sides and bottom edges closed.  For the sides, you will sew up to where the drawstring pocket starts, maybe leaving a 1/4 inch space in between.  Remember to backstitch at the beginning and end.

Finally, insert your string — attach a safety pin to one end of the string and insert it through a hole on one side.  Once you’ve reached the other side, insert it back in to the closest hole on the other side (sort of like doing a U-turn).  Leave at least 5 inches of string on each side, then cut and tie together.  Then, do the same for the other side.  Insert another piece of string into the opposite side you started at.

And there — you should have one huge drawstring pouch!  Now go fill it up with whatever your heart desires!

And now I leave you with a photo of the adorable 2-year-olds and some yummy goodness from the party!

xoxo, Jen

Airplane Birthday Party (Part 2)

On to the best part of party planning — the decorations!

Even though I had planned to have an airplane themed party for Ethan months before the event, all my decoration ideas came to me last minute so I was literally up until 5:00am the night before crafting and sewing.  And of course I didn’t finish.  But I did manage to make a few decorative pieces to fit the theme.  The party setup didn’t end up as dramatic as I wanted it to, but does a 2-year-old really care?  No, not really.  It was more for me, I think!

I used felt for everything.  It’s so easy to work with.  I had purchased a bunch of the small felt craft sheets at Joann.

I wanted to make a simple banner that was less time consuming than the fabric one I had put together a couple months ago.  Using felt was the perfect choice.  It was easy to sew and it didn’t fray.  I traced the letters on the back of a heat n’ bond sheet and fused them onto white felt to cut out.  The font is from here – it’s the same font I used for the fabric banner.  Next, I cut out 28 rectangles (14 red and 14 turquoise ones) and 14 pieces of (decor bond) fusible interfacing, each about 4.5 by 5.5 inches in size.  I sandwiched the interfacing between 2 rectangles and sewed the edges closed (by topstitching) with a small white rectangle enclosed at the top for the loop.  It was super easy — no need to to turn the piece inside out!  I then inserted a string of jute twine through each rectangle loop and voilà – there’s my felt birthday banner!  Pretty snazzy, eh?

My next project was an airplane banner.  I knew that this would be the most time consuming piece but I really wanted to hang a few airplanes and clouds up on the wall!

I had a small wooden airplane I had purchased from Michael’s a while ago for another project so I used that as a template to make my airplanes.  I made three airplanes but needed to cut out double the amount of pieces because I added a layer of interfacing to make them firmer.  The airplanes weren’t exactly the prettiest things from the back side, but they were being hung on a wall so it didn’t really matter.  I did the same for the clouds – added some interfacing between two pieces of white felt.  I sewed a small loop on the back of each piece to string the jute twine at the end.  What do you think?  Not so bad for making this banner last minute, right?

And finally, I made a simple bunting banner.  The pennants were small – only 4″ by 4″.  Again, I added interfacing to make them stiffer.  I sandwiched the interfacing between two felt triangles and only sewed the top closed.  I then sewed another line about 1 cm from the top seam to create a pocket for the string.  That’s it!  I got lazy and didn’t sew the edges closed around the triangle.  But hey, it still looked alright from a distance when hung up!

I know I’ve said this before – banners make me so happy!  They are festive and can really jazz up a space.  They are a must for every party!  It was definitely worth staying up for!

xoxo, Jen

Airplane Birthday Party (Part 1)

Ethan had his second birthday party last weekend.  It was a little chaotic with all his little buddies running around our small condo, but it was a super fun time and I wouldn’t change a thing!  I can’t believe my baby is TWO already!  How quickly time flies… Yes, that’s a picture above of Daddy blowing out Ethan’s candles!  Hopefully he will get to blow out his own candles next year!  lol.

We decided that the theme of his party would be airplanes and the colors red, turquoise and white.  Ethan is still too young for a themed party, but we did ask him what type of party he wanted, and he responded “Jay-Jay!” (meaning Jay-Jay the Jet Plane).

I created the party invitation on PowerPoint and printed them out on blank white note cards that I purchased at Michael’s.  I love how the invitations turned out – simple but attractive (at least I think so!).  I chose Rumpelstiltskin font because it’s just so fun and whimsical – perfect for a kid’s party invitation.  I’m also obsessed with buntings so I needed to include one on the card.  Who knows if Ethan will let me design his invitations next year?!

I also made Ethan a birthday t-shirt with the number two on it.  I used turquoise felt for the number and appliqued it onto an old t-shirt using deep red thread to make the number pop (and to match the theme colors!).

This was supposed to be the goodie bag but I only had time to make a few before the big day so they never made it to the kids (sadly).  I ended up putting all the party favors into little white paper bags.  Not as cute, but it worked.

I love these little drawstring bags though.  They were so easy to make – just two felt rectangles sewn together and turned right side out with pockets on the top for the drawstring.  I used jute twine for the string because I had so much of it on hand.  And I just had to sew a cloud on it because the bag wouldn’t have been complete without it.

The cake was from Baskin Robbins.  Everyone loves ice cream and cake together so why not just get an ice cream cake!  I love how it turned out.  The girl who made it did such an awesome job.  I told her we were having an airplane themed party and she said she’d work her magic.  And she did!  The cake was less than $30 and it was super cute and delicious.  Last year, we spent $100 on a cake from a special bakery that was the same size as this one and this one was just as amazing!

And I leave you with a picture of Ethan enjoying his tasty finger after he dug it into the cake!  Yummy.  More on decorations in my next blog post (part 2).  Enjoy!

xoxo, Jen